Knowledge base
All you need to know about the PCT

Forms
Each form contains a link to a help text. This help text contains a short explanation on how to fill out a form.
You can find the help text under the ?-icon right above the form:![]()
Yes, the default forms are customizable. You cannot delete the input fields, but you can add additional input fields by using the gear icon in the form: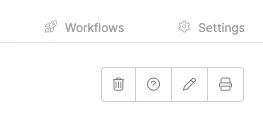
You have a choice of several types of fields you can add, for example: file upload, text field or checkboxes. You use this functionality for example when you want to add an extra comment that needs to be filled in.
By using the arrows on the right side you can determine the position where the field should be displayed:![]()
You can add a field in a form that displays the values from another form. Add a custom field using the pencil icon. Select the option ‘Reference’ or ‘Reference – multiple choice’. Then select the form and the field whose data should be shown. From now on it is possible to select the values from another form in a form.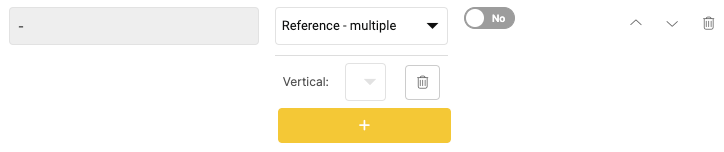
As a Full user, you have the rights to create a form in your environment. You can read here how to create a form and link it to the framework.
In the PCT under Custom Form Editor, you have the option to create your own form.
Click the green plus icon to create a new form. The title and form type are mandatory fields.
The next step is to create fields within the form. Using the plus icon, you can add a title, question, or text.
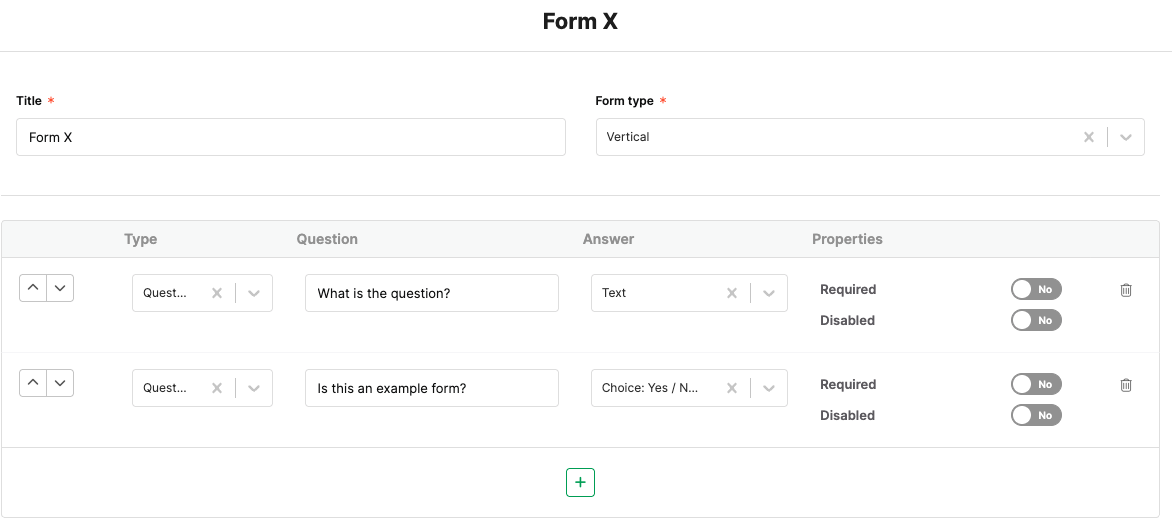
There are various answer fields you can add. Below are some examples:
File upload (Multiple or single) Checkbox
– Date
– User selection
– Number
– Choice (fixed selection or dynamic)
– Measures
– Text
– Color picker
– Choice (Yes/No/N/A)
Once you have created the form, you’ll want to link it to the section where it should be displayed. Go the the relevant section in the PCT, hover over it, and click the gear icon on the right side.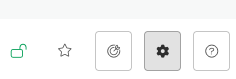
Go to the ‘Forms’ tab, enter the title of the new form, and click Add.
Do you want to modify, add, or delete a field later on? You can do this using ‘Edit custom fields’.
Only administrators are allowed to create and add forms.
When a form is fully completed, this is called a registration. For each form, all registrations can be viewed under Registrations.
If the data in a form allows it, it is possible to create charts. Administrators can create their own charts based on the form’s registrations via the Analytics section.
In General Settings you give the chart a title. At Display options you select the chart type. There are 5 types of graphs: line; bar; donut; polar; radar. The period from which data must be retrieved is specified under Data options. Under the Datasets section, you select which data from the form (the registrations) should be shown in the chart. Each dataset can ben given a title using the Label field.
Note! Charts linked to forms are generic and visible across the entire organization.
The chart dashboard, by default, displays data from the past 12 months. When you select a different time period, more or fewer tasks may be shown depending on the selected range.
Here you can see the selected time period: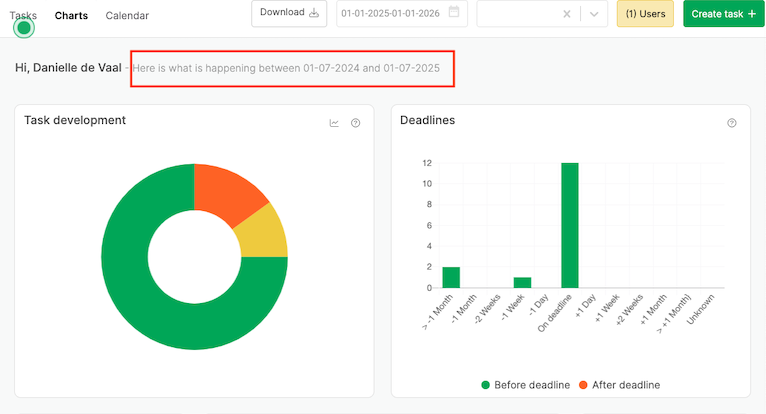
Would you like to change the search period? You can do so by adjusting the filter.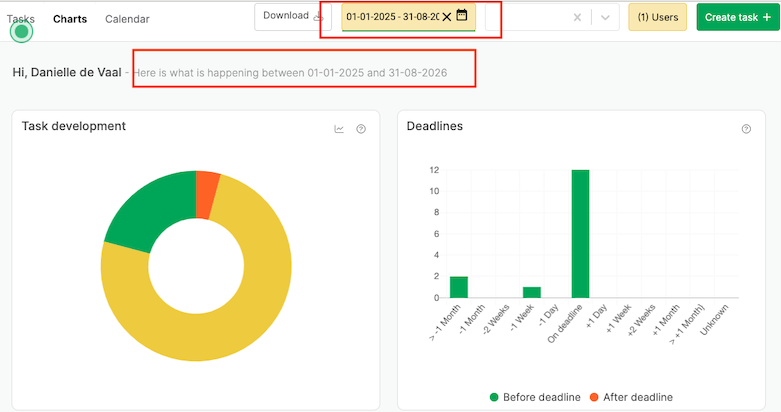
Yes, this is possible. Above the results you will find the ‘Select’ button. Then you have the option to select multiple results or use the ‘Select all’ button. Then click on Edit.
Yes, you can. Click your computer mouse on the right side and select ‘duplicate’.
Note! The duplicated registration will only be visible after a page refresh.
With the professional license, it is possible to view the audit trail of form registrations. Open the registration and click on ‘Show history’. Then you can see which fields have been modified and by who.
Yes, every form has an export and an import option. This button can be found in the form. Go to the results page and click on the icon with the document with the cross in the upper right corner. Here you can choose whether you want to import an Excel file or export the registrations to a new Excel file.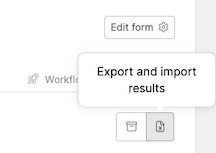
Full users have access to archived records. These can be found on the Registrations page of the form. Click the archive button in the top right corner. ![]()
In each form, the results page contains all the registrations from the form. These registrations can be blue or white in color.
White registrations are actual recordings, in principle no further follow-up action is required. Blue registrations are actions. This means that there is an action attached to the registration, or activities are planned. For example, because someone has to perform a check. These planned actions can also be viewed via the “Tasks and Measures” overview.
A Full user always has the ability to add fields, just like in the standard forms. If you want logic to be applied to fields, for example that another field changes when a specific answer is entered in another field, or that a field is not visible to all roles, you can submit a request to support.
Note! Once support starts adding this logic, the form becomes the property of PCT and fields can no longer be modified by administrators.
It is important to look at the permissions. Click on Settings, to the right of ‘workflows’. Here you can set authorizations.
Full users have the option to deactivate a form via the settings. Full users can deactivate a form trough the settings by setting ‘Form is active’ to No.
When a form is deactivated, it will still be visible to full users and displayed in grey. To completely remove the form from the framework, all settings must be set to No.
